Picture this: your kitchen fills with the rich aroma of something roasting, and when you finally open the oven, the crust is perfectly golden but the middle isn’t quite there. We’ve all had those underwhelming oven moments.
No one likes investing time and care in a meal, only to run into stuck-on messes, uneven cooking or pans that just can’t deliver that deep, crave-worthy flavor. It’s not just annoying—it can really take the joy out of cooking.
But here’s the thing: with the right cast iron oven cooking guide, you’ll learn exactly how to bake, roast, and finish dishes like a pro—getting even results, bold flavors, and pans you’ll love for years. Ready for your next kitchen win?
Understanding Cast Iron: Properties, Benefits And Common Myths
Casting iron cookware has a mystique that can feel both legendary and intimidating—so what’s the real deal behind all the fuss? Understanding cast iron means breaking out of the myths and appreciating what this material truly brings to your kitchen. The secret: it’s not magic, but smart science that makes it special.
First, let’s look at its standout properties. Cast iron distributes and holds heat like almost nothing else on the home market. When properly preheated, these pans maintain steady oven temperatures—ideal for roasts or baking sourdough. The heavy mass means slower heat-up, but that same weight keeps the temperature steady even when oven doors open or cool ingredients are added.
- Durability: With care, a cast iron Dutch oven or skillet can last generations—even improving with use.
- Nonstick Patina: Over time, seasoning (the baked-on fat layer) naturally builds up, making food release easier without synthetic coatings.
- Versatility: Few materials go from stovetop to oven so seamlessly and withstand high temperatures for browning, baking, and finishing dishes.
💡 Pro Tip: According to guidelines from the Cookware Manufacturers Association, cast iron is naturally PFOA- and PTFE-free, posing fewer health worries than some nonstick coatings when used at high heat.
Picture this scenario: you’ve inherited an old skillet from your grandmother’s kitchen. The pan is black, a little rough, maybe a bit tacky. You wonder—is it safe? Truth is, with a quick scrub and fresh seasoning cycle, it’s likely better than new. The layers of built-up seasoning are what give cast iron its legendary nonstick and flavor-enhancing properties. Just avoid harsh soaps and don’t panic over a spot of surface rust—it’s usually easy to fix.
| Feature | Cast Iron | Stainless Steel |
|---|---|---|
| Heat Retention | Excellent—holds heat for searing, baking, roasting | Good, but cools faster once off heat |
| Oven Compatibility | Virtually unlimited—works at high temps | Usually limited by handle/materials |
| Nonstick Quality | Improves with seasoning | Requires oil or added coating |
It’s worth noting: cast iron isn’t fragile, but sudden temperature shocks (like running cold water on a hot pan) can cause cracks. The good news? Organizations like America’s Test Kitchen confirm that most modern cast iron, like Lodge or Staub, is robust enough for daily use and easy to maintain.
But there’s one detail most owners completely overlook until it’s too late…
How To Season And Prep Cast Iron For Oven Perfection
Ever pulled a gorgeous casserole out of the oven—only to find your cast iron bubbling with stuck-on bits or patchy crust? You’re not alone. Seasoning and prepping your cast iron for oven use isn’t just a tradition, it’s a strategy for nonstick, crave-worthy results every single time.
Let’s break down what you’ll need before you start:
- Uncoated cast iron skillet or Dutch oven
- Neutral oil with a high smoke point (canola, grapeseed, flaxseed, or even Crisco)
- Paper towels or lint-free cloth
- Aluminum foil or a baking sheet to catch drips
- Reliable oven set to 450°F (232°C)
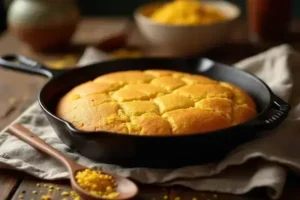
In practice: imagine grabbing your skillet for a batch of cornbread. It’s slightly dull, maybe a bit rough. You want the slice to lift out smoothly, golden and perfect. That finish? It starts with the right seasoning process—only takes about 1 hour, and it pays off for years.
- Clean the Pan: Wash with warm water; use a drop of mild soap if you’re removing factory coating or heavy residue—then dry thoroughly.
- Apply Oil: Rub a very thin, even layer of oil all over (inside, outside, even the handle!) using a lint-free cloth.
- Buff Excess: Wipe off every bit of excess oil—truly, less is more, or you’ll end up with sticky spots.
- Bake Upside Down: Place the pan upside down in the oven with a sheet of foil below it. Bake at 450°F for 1 hour.
- Cool Before Using: Let the cookware cool in the oven so the seasoning locks in smoothly. Repeat steps 2–4 for even glossier finish, if desired.
⚠️ Important Warning: According to the U.S. Department of Agriculture, never season or store cast iron cookware while wet—it can lead to rapid rust, undermining years of careful use.
This process creates a slick polymerized layer—what pros call the “patina”—and it’s key to the nonstick magic. The patina builds with every use, especially when you favor oven-finished recipes where sustained heat helps the oil bond tightly to the metal.
Skip tools like olive oil, which has a low smoke point and can get sticky, or coconut oil, which leaves an odd scent. For the easiest touch-ups, commercial cast iron conditioners like those from Lodge are recommended by America’s Test Kitchen for home use—affordable, safe, and easy to find.
What actually works might surprise you…
Step-By-Step Guide To Baking And Roasting In Cast Iron
So you’ve seasoned your pan and you’re eyeing that perfect roast or golden bread—what now? The beauty of cast iron is its reliable, even performance, but there’s a learning curve to truly unlocking those deep flavors and stunning textures. What’s the foolproof method for baking and roasting in cast iron?
- Seasoned cast iron skillet or Dutch oven
- Oven mitts or silicone grips (cast iron gets hot—handle with care!)
- Oven thermometer (optional, but boosts accuracy)
- Parchment paper or trivet (depending on recipe)
- Your chosen ingredients
- Preheat the Cast Iron: Place it empty in a cold oven, then heat to recipe temperature (usually 425–475°F). Cast iron needs time to absorb and radiate heat evenly; this prevents cold spots.
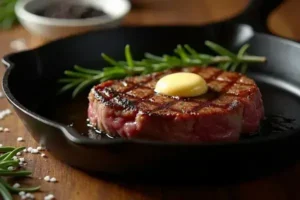
- Prepare the Ingredients: While the pan heats, season and arrange your food—the hot surface sears instantly for better browning and crust.
- Transfer Quickly and Safely: Using oven mitts, remove the hot pan, add food (you’ll hear a sizzle!), and return it to the oven immediately to lock in heat.
- Monitor and Adjust: Rotate the pan halfway through if your oven has hot spots. Cast iron holds heat, so dishes may cook faster—check a few minutes early.
- Rest Before Serving: Cast iron stays hot long after leaving the oven. Rest meats for 5–10 minutes, or bread for at least 15, to finish carryover cooking and prevent sticking.
💡 Pro Tip: According to the Culinary Institute of America, baking and roasting in cast iron can actually reduce the need for added oils—its naturally nonstick surface means crispier results without the fat overload.
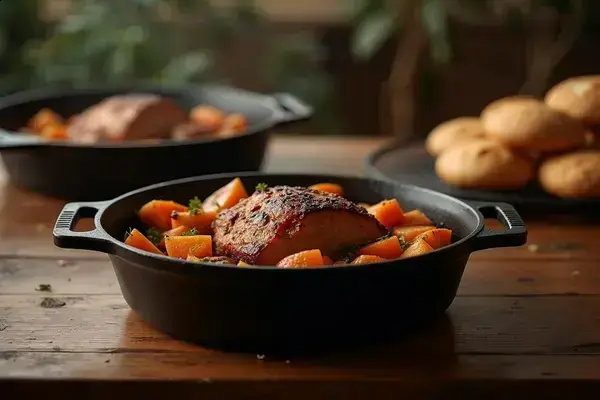
Picture this scenario: You pull a Dutch oven of no-knead bread out and hear that hollow thump as you tap the golden crust. Or maybe it’s a chicken with a crackling, lacquered skin from the intense, direct heat retained by cast iron. These aren’t just lucky moments—with practice, this becomes the consistency you count on for every Sunday roast or weeknight bake.
| Dish Type | Prep Tips | Result |
|---|---|---|
| Bread | Use parchment for easy lift-out, preheat pan | Thick, deep crust with chewy crumb |
| Chicken | Dry skin, coat lightly with oil, high temp | Crispy skin, juicy interior |
| Vegetables | Toss in very light oil, arrange evenly | Charred edges, soft centers |
And this is exactly where most people make the most common mistake…
Mastering Finishing Touches: Browning, Crisping And Caramelizing
Ever wondered why restaurant meals have that irresistible golden crust or glossy caramel finish? There’s an art to browning, crisping, and caramelizing in cast iron—and it’s all about using temperature and surface area to your advantage. Your oven does most of the heavy lifting, but the finishing touches separate “pretty good” from “truly outstanding.”
- Start with dry, prepped ingredients—moisture is your enemy.
- After oven roast or bake, finish under the broiler for 2–3 minutes for a shatteringly crisp top on things like mac and cheese or gratins.
- For meats or vegetables, rest the dish outside the oven but inside the hot cast iron for a few minutes—the residual heat deepens caramelization without burning.
- If you want extra color or crisp, return uncovered to the oven at the highest safe setting and watch closely.
- A drizzle of oil or a sprinkle of sugar before the final minutes boosts browning and creates those textbook caramelized edges.
Picture this scenario: You pull out a pan of roasted potatoes—steam rises, but the edges still seem pale. A quick return to the oven, with just a spoon of clarified butter, turns them gorgeously crisp in minutes. Or maybe you’re glazing salmon. The last two minutes under the broiler sets the glaze without overcooking the fish.
💡 Pro Tip: According to guidance from the National Restaurant Association, allow cast iron dishes a few extra minutes of ‘carryover’ after removing from the oven, since their dense iron keeps caramelizing sugars and crisping crusts even out of direct heat.
| Finish | Best Method | Flavor Impact |
|---|---|---|
| Browning | High heat + dry ingredients | Deep flavor, rich color |
| Crisping | Final broil or uncovered bake | Crunchy texture |
| Caramelizing | Sugar, honey, or natural starches with oven finish | Sweet-savory complexity |
And honestly? This is where most home cooks hesitate—worried they’ll burn, not brown. But a watchful eye and those last few minutes of focused heat are exactly what set your dishes apart from the crowd…
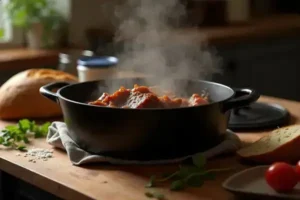
Cleaning, Storing And Troubleshooting Common Cast Iron Issues
It’s a classic dilemma: you spent hours on that perfect roast, but now your cast iron has stubborn bits stuck on—and a few slick, sticky spots. How do you clean cast iron properly, store it so it stays rust-free, and troubleshoot those annoying issues every owner faces?
- Cleaning: Wash by hand with warm water immediately after use. You can use a drop of mild soap, but never soak for long periods. For stuck-on food, scrub gently with a chainmail scrubber or non-metal brush. Dry thoroughly right away—moisture is the enemy of seasoning.
- Storing: Coat your pan lightly with oil before storing. Make sure it’s completely dry. Store uncovered (or with a paper towel between lid and pot) to let air circulate and prevent trapped moisture.
- Troubleshooting: Sticky surface? That means leftover oil—put the pan in a hot oven (450°F) for 30 minutes to re-bake the seasoning. Rust spots? Scrub with a bit of coarse salt and oil, rinse, dry, then re-season. Flaking? Strip the pan and re-season from scratch for a fresh start.
| Problem | Solution | Prevention |
|---|---|---|
| Rust | Remove and re-season pan | Keep dry & lightly oiled |
| Sticky Finish | Bake at high temp to harden oil layer | Wipe off excess oil before storage |
| Food Sticking | Re-season or add oil for cooking | Maintain regular seasoning |
⚠️ Important Warning: According to recommendations from the University of Illinois Extension, never put cast iron in a dishwasher or let it air dry—both will quickly destroy the seasoning and encourage rust.
In practice: Let’s say you left your favorite skillet to “air out” after a big family dinner, only to find orange rust creeping along the edge the next morning. It happens—don’t panic. Scrub it, dry it, oil it, then slide it into a warm oven. With regular care, even long-abused pans can be brought back to life.
The right habits in place now make everything easier from here.
Your Cast Iron Confidence Starts Here
If you take just one thing from this cast iron oven cooking guide, let it be: great results come from simple habits—season well, use high heat wisely, and care for your pan with respect. From understanding iron’s strengths to nailing cleaning routines, you’ve learned how to get flavor, performance, and longevity from every bake, roast, and finish.
Maybe cast iron felt intimidating before—sticky pans, unpredictable crusts, worries about rust or cleaning. Now you know what really works. You can handle seasoning, get gorgeous browning, and bring old pans back to life. It doesn’t take perfection, just a little know-how and your own hands.
What’s your next cast iron project—crusty bread, perfect roast chicken, or golden potatoes? Share your plans or kitchen wins in the comments below!

Blake Aaron Mercer is a cast iron cookware enthusiast and home cook dedicated to helping everyday people get the most out of their skillets, Dutch ovens, and griddles. With years of hands-on experience seasoning, restoring, and cooking with cast iron, Blake built Hnnew to be the honest, practical cast iron resource he always wished existed when he was starting out.