Picture this: you lift the heavy lid of a cast iron dutch oven, and the aroma of slow-cooked food fills your kitchen — it’s pure comfort, right? But if you’ve ever wondered why your pot roast didn’t fall apart or your bread stuck stubbornly to the pan, you’re definitely not alone. Cast iron magic can feel like a well-kept secret.
The thing is, a dutch oven can be a game changer, but only if you unlock its full potential. Too often, people try to wing it and end up frustrated — meals turn out tough, burnt, or just bland, and that beautiful piece of cookware sits unused on the shelf. It’s disheartening when you don’t get the rich, unforgettable flavors you hoped for.
By the time you finish reading, you’ll know exactly how to master the cast iron dutch oven guide cooking essentials for braising, baking, and slow cooking. Expect practical techniques, insider tricks, and the kind of confidence that makes you actually look forward to your next homemade meal. Ready to upgrade your kitchen routine?
Choosing The Right Dutch Oven For Your Cooking Style
Ever stood in a cookware aisle, staring at a wall of dutch ovens, completely unsure which one will actually fit your cooking dreams? You’re not alone. Among the shelves—enameled, raw cast iron, all kinds of sizes and colors—it can feel like every pot is promising something special. So, how do you really choose?
It all starts with how you cook. Do you crave rustic slow-braised stews, crave-artisan bread, or multi-step Sunday roasts? Each cooking style asks different things from your dutch oven. For slow cooking, heat retention is everything. For no-knead bread, you’ll want excellent nonstick properties. Here’s the thing: capacity and shape matter more than most shoppers realize, especially if you’re feeding more than two.
💡 Pro Tip: According to America’s Test Kitchen, round dutch ovens between 5 and 6 quarts (with wide bases) are the single most versatile choice for most home cooks—large enough for family meals but still manageable for daily use.
Picture this scenario: You’re planning to sear a big cut of beef and then finish it low and slow. An oval shape means more surface for browning, but they can be clunky and may not fit snugly on smaller stovetops. In practice, serious bread bakers often go for a tall, narrow round pot to promote even heat around the loaf, while folks focused on batch stews and soups lean toward wider, flatter bases for easier stirring.
| Type | Best For | Unique Features |
|---|---|---|
| Enameled Cast Iron | Braising, baking, easy cleanup | No seasoning needed, many colors, won’t react with acidic foods |
| Raw Cast Iron | High-heat browning, durability | Requires regular seasoning, ultra-long lifespan, rustic look |
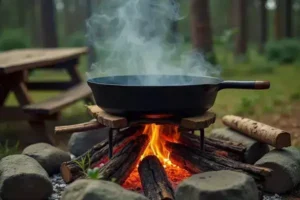
| Double Dutch (Lid = Skillet) | Versatility, camping | Lid doubles as a skillet, often uncoated, great for open fire |
The Lodge Dutch Oven (Lodge Manufacturing), the Le Creuset Signature line (Le Creuset), and Staub Cocotte (Zwilling Group) are some of the most recommended options by culinary organizations like Good Housekeeping Institute. Each brings its own pros and quirks, from warranties to weight.
In practice: a friend obsessed with sourdough swears by her 4.5-quart enameled round model—she loves the easy cleaning. But when she switched to large-batch chili or roasted a whole chicken, she realized a larger, wider model would have saved her trouble. It’s not just about the brand or the pretty color. Stainless steel knobs, enamel chip-resistance, handle comfort, and oven-safe ratings beyond 450°F—all matter when you actually put it to use regularly.
One last thing: always check your oven and stove dimensions before buying. Some “standard” models are surprisingly bulky and heavy. And this is exactly where most people make the most common mistake…
How To Prep And Season Cast Iron For Best Results
Wondering why your food keeps sticking or developing odd flavors in your cast iron? Seasoning isn’t just a tradition—it’s the secret that turns cast iron into truly nonstick, flavor-rich cookware. Here’s the thing: prepping and seasoning aren’t complicated, but every shortcut shows up on your plate.
- Cast iron dutch oven (raw, not enameled)
- Mild dish soap
- Non-abrasive sponge or brush
- Clean, lint-free cloth or paper towels
- High smoke-point oil (grapeseed, canola, or flaxseed oil)
Quick safety note: Certified organizations such as the USDA and Lodge Manufacturing advise using only food-grade oils and never heating an empty pan unattended. This protects both your health and your investment.
- Wash thoroughly: Scrub with warm, soapy water once before the first seasoning—this is the only time you’ll use soap. Dry completely with a clean cloth.
- Oil every surface: Pour about a tablespoon of oil. Rub it over the pot and lid, inside and out, including handles.
- Remove excess: Wipe until only a thin, even film remains—any pools of oil will leave sticky spots instead of a smooth finish.
- Bake it right: Place upside-down on the middle rack of a cold oven. Put foil underneath to catch drips. Bake at 450°F (232°C) for 1 hour.
- Cool gradually: Let the oven cool down naturally with the pot inside. This hardens the protective layer for that classic nonstick feel.
💡 Pro Tip: Want a glassy, restaurant-quality finish? Repeat the oil-and-bake cycle 2-3 times. The more you use and re-season your dutch oven, the better it gets—real cast iron rewards patience and consistency, not quick fixes.
In practice: imagine prepping your dutch oven for a winter stew. The first time, maybe your sear sticks a bit. But—after a few rounds of proper seasoning—potatoes crisp and beef slides free. That’s the alchemy professional chefs love about cast iron, and why America’s Test Kitchen insists that homemade seasoning always outperforms any factory coating.
What actually works might surprise you…
Mastering Braising: Tender Dishes With Rich Flavor
Braising isn’t just a technique—it’s the magic that turns something tough and cheap into a supper that melts on your fork. But what’s the real secret to building deep, lingering flavor in a dutch oven? It’s all about a few deliberate steps, not throwing everything into a pot and hoping for the best.
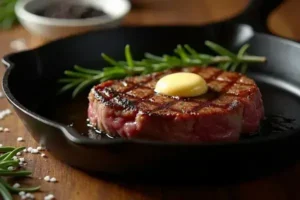
- Choose the right cut: Go for marbled, collagen-rich meats like chuck roast, short ribs, or pork shoulder. These transform during a long, slow cook.
- Pat dry and season: Dry protein means better browning. Generously salt, pepper, and (if desired) dust with flour for crust-building.
- Sear in batches: Get all sides caramelized in a splash of oil over medium-high heat. Don’t crowd the pot—brown in small groups.
- Layer in aromatics: Onions, garlic, carrots, celery—sauté briefly to pull the fond (browned bits) off the bottom. That’s where flavor lives.
- Add liquid—thoughtfully: Classic braises use a mix of stock, wine, or beer. You want enough to come about one-third up the side. Too much, and your dish boils instead of braises.
- Low and slow: Cover tightly. Cook in a 300°F (150°C) oven for 2–4 hours, depending on the meat. The low temp gently dissolves collagen and coaxes out silky juices.
- Rest and finish: Once fork-tender, rest your dish in the juices. Skim excess fat, adjust seasoning, and hit it with a splash of acid or fresh herbs right before serving.
💡 Pro Tip: According to the Culinary Institute of America, leaving the lid slightly ajar for the last 30 minutes of braising helps the sauce reduce—creating a glossy, concentrated finish you’ll crave.
In practice: imagine you’re working with a tough chuck roast. You sear it, build a mountain of flavor with onions and garlic, deglaze with red wine, and slide the pot in the oven. Hours later, you open the lid. The meat slumps at the touch of a fork and the sauce is thick enough to cling to the back of a spoon. That’s braising done right—and your kitchen feels like a high-end bistro, not just a spot to microwave leftovers.
But there’s one detail most owners completely overlook until it’s too late…
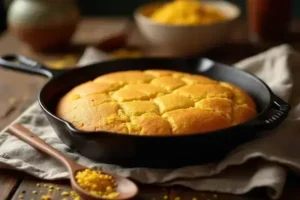
Perfect Baking Techniques In A Dutch Oven
Ever wondered why bread from a bakery seems to have that unbeatable golden crust and a springy, open crumb, but your home loaves fall flat (literally)? Here’s the thing: the dutch oven is your secret weapon for professional-grade baking—even in a basic home oven.
- Uncoated or enameled cast iron dutch oven (4–6 quart size is most versatile)
- Parchment paper
- Oven mitts and trivet
- Sharp razor or bread lame
- Instant-read thermometer (optional, but ideal)
5 Steps to Bakery-Quality Bread
- Preheat for power: Place your dutch oven (lid on) in a cold oven. Heat both at 475°F (246°C) for at least 40 minutes. This captures the “hearth effect.”
- Shape and proof: Once your dough has risen, gently transfer it to parchment. Score the top deeply (for oven spring and artful design).
- Transfer and bake covered: Drop dough (on parchment) into the blazing hot pot. Cover and bake 20–25 minutes. Steam trapped by the lid will boost rise and shine.
- Bake uncovered for crust: Remove the lid. Continue baking 15–25 minutes—watch it brown and blister for that crackle.
- Cool for structure: Let bread rest on a wire rack at least 60 minutes. The starches and crumb set as it cools, so don’t rush!
💡 Pro Tip: According to King Arthur Baking Company, a preheated pot is critical—place dough gently but quickly to maintain heat for maximum rise and crust formation.
In practice: after a weekend of failed loaves, Mark (a home baker) tried the double heat technique. He couldn’t believe the transformation—his bread shot up tall, the bottom didn’t burn, and the crust popped and cracked with every slice. The dutch oven retained and radiated heat so evenly that even his first-time sourdough looked like it came straight from a Parisian boulangerie.
And this is exactly where most people make the most common mistake…
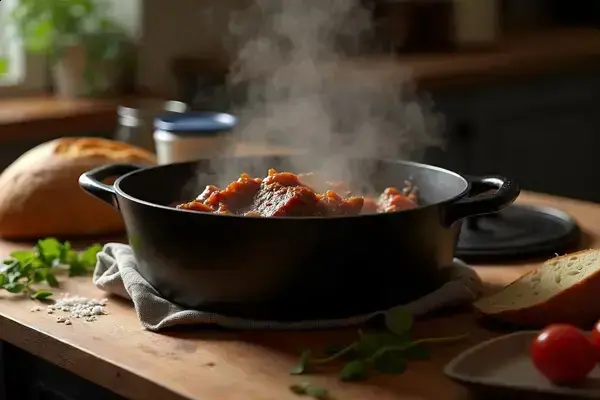
Slow Cooking Secrets: Creating Deep, Complex Flavors
What makes slow-cooked meals taste like they simmered for days, with sauce clinging to every bite and meats that practically melt under your fork? The secret isn’t just time—it’s how you use the dutch oven to coax out every ounce of flavor. Let’s dig into what actually delivers those restaurant-worthy results at home.
| Slow Cooking Element | Why It Works | How To Maximize |
|---|---|---|
| Low, Steady Heat | Breaks down tough proteins and fibrous veggies | Keep temperature at 200–250°F (93–121°C) for hours |
| Tight-Fitting Lid | Traps moisture for self-basting and deeper braise | Leave lid on except for final thickening |
| Layered Aromatics | Builds base notes—flavor develops over time | Sauté onion, celery, garlic until golden before adding liquid |
Picture this scenario: On a chilly Sunday morning, you prep a simple beef stew, barely covering the meat and vegetables with broth in your seasoned dutch oven. Hours tick by. As gentle bubbles rise, flavors intertwine—the onions turn jammy and the beef becomes fork-tender, all while you go about your day. By dinner, even leftovers taste like you fussed for hours, thanks to the Maillard reaction (that brown, savory magic) and careful moisture control.
💡 Pro Tip: The James Beard Foundation recommends finishing slow-cooked dishes with a splash of vinegar or citrus—just before serving—to brighten flavors and add complexity that wakes up the palate.
- Don’t rush the prep: Browning isn’t optional. Sear every component for richer flavor, even if it adds a few minutes up front.
- Minimal liquid, maximum impact: Too much broth or water waters down flavor. Let the natural juices shine.
- Cool-down counts: Stews and braises actually improve overnight as flavors meld and deepen in the chill of your fridge.
In practice: A seasoned cook makes their Hungarian goulash in a cast iron dutch oven every winter. Each batch simmers low and slow, absorbing smoke from sweet paprika and softening root veggies. By the next day, the flavor isn’t just good—it’s legendary, and every spoon seems even richer than the last. The right habits in place now make everything easier from here.
Your Dutch Oven Confidence Starts Here
If you take just one thing from this cast iron dutch oven guide cooking, let it be: success comes from the details—right oven, patient prep, and letting the flavors build slow. Mastering seasoning, braising, baking, and slow cooking isn’t luck. It’s learning the quirks of your cast iron and using them with purpose.
Maybe you once felt stuck—wondering why meals stuck too, why flavors felt flat, or which dutch oven was right. Now, you know how to prep, season, and coax out results that would make any pro proud. You can walk into your kitchen excited, not stressed. Turns out, great comfort food is just a few small steps away.
What recipe are you most excited to try in your dutch oven now? Share your plans—or your best tips—in the comments below!

Blake Aaron Mercer is a cast iron cookware enthusiast and home cook dedicated to helping everyday people get the most out of their skillets, Dutch ovens, and griddles. With years of hands-on experience seasoning, restoring, and cooking with cast iron, Blake built Hnnew to be the honest, practical cast iron resource he always wished existed when he was starting out.