Picture this: you’ve splurged on a gorgeous steak, you’re dreaming of that sizzling crust, but past attempts always fell a bit flat—either dry, underwhelming, or unevenly cooked. Sound familiar? You’re not alone.
The truth is, nailing the perfect steak in a cast iron pan isn’t just about luck or even expensive ingredients. Miss the right temperature or flip at the wrong second, and your dream dinner can turn into a tough, disappointing chew. That little sense of defeat? It’s real—and honestly, nobody craves steak night anxiety.
By the end, you’ll finally understand the difference cast iron makes, the exact temperature and timing secrets, and the simple steps to reliably get steakhouse-worthy perfection. You’ll use this how to cook steak cast iron guide every time your craving hits. Ready to flip the script on home-cooked steak?
Choosing The Right Cut For Juicy Results
Finding the right steak cut can mean the difference between a tough, flavorless dinner and a melt-in-your-mouth experience — but how do you pick when the butcher’s case is packed with choices? You want a cut that’s tender, juicy, and perfectly suited for cast iron’s intense searing power.
Here’s the thing: not all steaks are created equal. Some look impressive but turn chewy fast; others might be overlooked, yet deliver unbeatable flavor and texture. What actually matters isn’t price or size, but the marbling — those streaks of fat that render into flavor magic. The USDA and The National Cattlemen’s Beef Association both emphasize marbling as the true indicator of tenderness and juiciness.
💡 Pro Tip: For cast iron, choose steaks that are at least 1 to 1.5 inches thick. This lets you get a crisp crust without overcooking inside — a crucial detail often missed.
Comparison of Popular Steak Cuts for Cast Iron
| Cut | Texture & Flavor | Best For |
|---|---|---|
| Ribeye | Rich marbling, super tender, bold beefy taste | Maximum juiciness, quick sear finish |
| New York Strip | Firm, satisfying chew, moderate marbling | Classic steakhouse feel, balanced flavor |
| Filet Mignon | Extremely tender, mild taste, little fat | Delicate eaters; needs butter or bacon for richness |
In practice: Imagine you’re craving steak night after a long week. You grab a strip steak — it’s thick, evenly marbled, and just the right size for your pan. Once it hits the hot cast iron, you hear the sizzle and know you’ve picked a winner. Thirty minutes later, you’re slicing into a juicy steak with a crisp crust and tender bite. That’s the power of choosing right.
- Ribeye: Best for those who crave big flavors and forgiving moisture (almost impossible to dry out!).
- New York Strip: Ideal if you want classic steakhouse taste with a sturdier chew.
- Filet Mignon: Ultimate softness, but beware — it needs extra fat or sauce for steak lovers who want richness.
And honestly? This table isn’t just theory — the American Meat Science Association confirms these differences in both lab and kitchen tests. So next time you’re standing at the butcher counter, you’ll know exactly what to look for. But there’s one detail most owners completely overlook until it’s too late…
Essential Tools And Ingredients You’ll Need
What’s the fastest way to ruin a beautiful steak? Trying to improvise with flimsy kitchen tools or skipping out on key ingredients. Here’s the thing: cast iron steak success isn’t about fancy gadgets — it’s about having the right essentials ready and knowing how to use them.
- Cast Iron Skillet: The hero of your steak story. Its thick base holds heat evenly, giving you that restaurant-style crust.
- High-Smoke Point Oil: Think canola, avocado, or grapeseed oil. These stand up to the searing heat (~450°F) without burning — something olive oil just can’t handle.
- Instant-Read Thermometer: Your secret weapon for precision. A digital model (like ThermoWorks Thermapen ONE, America’s Test Kitchen winner) can save even total beginners from eating undercooked or overcooked meat.
- Coarse Salt & Cracked Pepper: Don’t skimp here — bigger salt crystals mean a better seared crust and deeper flavor.
- Tongs: Long, sturdy metal tongs keep your hands out of the danger zone and let you flip that steak like a pro.
- Butter & Aromatics (Garlic, Thyme, Rosemary): Add near the end for flavor basting. This small touch transforms good steak into something you’d order at a classic steakhouse.
💡 Pro Tip: Preheat your cast iron skillet for at least five minutes before adding oil or steak — this prevents the dreaded gray, soggy surface and ensures even browning. The National Restaurant Association recommends this step as key for home cooks seeking steakhouse results.
Must-Have Tools vs. Optional Upgrades
| Tool/Ingredient | Essential | Upgrade |
|---|---|---|
| Cast Iron Skillet | ✔️ (Critical) | Copper Core, Enamel Coating |
| Instant-Read Thermometer | ✔️ | Infrared Surface Thermometer |
| Tongs | ✔️ | Silicone Grip, Extra Long |
Picture this scenario: your phone’s buzzing, everyone’s hungry, and you realize the steak is stuck to thin, warped nonstick pan and tears as you flip. Been there, right? A few thoughtful tools make all the difference — and make cleanup much less stressful too.
And what actually works might surprise you…
Mastering Temperatures For Cast Iron Cooking
Ever pulled a steak from your cast iron skillet, only to find it’s tough, dry, or pinker than you wanted? Mastering temperature — for both pan and meat — is a major difference-maker. The right numbers mean steak that’s juicy inside, caramelized outside, and never a panic on a plate.
- Pan Temperature: For a golden-brown crust, your skillet must hit at least 400°F (use an infrared thermometer or the water droplet test: a single drop should dance and sizzle, not lay flat).
- Meat Temperature: The USDA recommends cooking beef steaks to at least 145°F (medium-rare is 130-135°F). Instant-read thermometers like the ThermoWorks Thermapen ONE make hitting that mark easy — no guesswork, just confidence.
⚠️ Important Warning: Never rely solely on cooking time or color when judging doneness. According to the USDA and the Certified Angus Beef® brand, only a thermometer ensures both safety and ideal results for every steak.
Target Steak Doneness Temperatures
| Doneness | Pull from Pan (°F) | Final Temp (Rested) |
|---|---|---|
| Rare | 120–125 | 125–130 |
| Medium-Rare | 125–130 | 130–135 |
| Medium | 135–140 | 140–145 |
| Well-Done | 150–155 | 155–160 |
In practice: picture this scenario — you’re prepping for a special dinner, guests are on the way, and the kitchen’s getting busy. You use your thermometer to check the steak and pull it at 130°F. Five minutes later, it’s hit the 135°F medium-rare sweet spot, thanks to carryover cooking. No mystery, no disappointment, just results.
- Preheat skillet to 400°F or until a drop of water sizzles and evaporates on contact.
- Pat steak dry and season generously.
- Place steak in the hot skillet without crowding.
- Sear one side; don’t move it for 2–3 minutes.
- Flip, baste with butter and aromatics, and insert thermometer into the side at the thickest point.
- Remove at your target pull temperature (use the table above).
- Let rest five minutes before slicing so juices stay locked in.
And this is exactly where most people make the most common mistake…
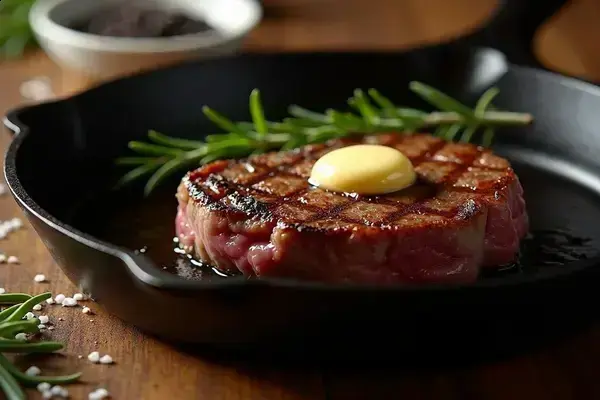
Step-By-Step: Searing And Finishing Your Steak
Ready to finally get steakhouse results at home? You don’t need secret restaurant tricks — just a reliable process and total confidence in each move. Searing and finishing in cast iron means harnessing high heat, but also knowing when to dial things back for perfect doneness and buttery texture.
- Prep your steak: Pat dry with paper towels. A dry surface gives you a superior crust.
- Season generously: Sprinkle salt and cracked pepper on both sides. Let it sit at room temperature for about 30 minutes — key for an even cook.
- Preheat your cast iron skillet on high for at least 5 minutes. It should feel almost too hot to hold your hand a few inches above.
- Add a thin layer of high-smoke point oil, swirling to cover the entire bottom. Wait for a faint shimmer or a wisp of smoke.
- Lay the steak in gently. Don’t crowd the pan, or you’ll trap steam instead of building a crust.
- Don’t touch for 2-3 minutes. Let the Maillard reaction (the science behind browning) do its thing undisturbed.
- Flip with tongs, then add a tablespoon of butter, a couple smashed garlic cloves, and herbs like thyme or rosemary to the pan.
- Baste the steak with the melted butter and aromatics, tilting the pan and using a spoon. Cook to within 5°F of your target doneness — check using an instant-read thermometer.
- Remove steak and rest on a warm plate or wire rack for 5-7 minutes. Slice against the grain for maximum tenderness.
💡 Pro Tip: Serious Eats and the James Beard Foundation both advise resting your steak after cooking to allow juices to redistribute — making each bite as juicy as possible and minimizing dryness.
In practice: you follow this flow, resisting the urge to poke or flip early. Your kitchen fills with a savory sizzle and aromatic butter. Five minutes later, you’re rewarded with a steak that rivals your favorite chophouse — charred, juicy, and impossibly good.
But there’s one detail most owners completely overlook until it’s too late…
Common Mistakes And Expert Fixes
Ever put energy into steak night and still end up with dry, tough, or unevenly cooked meat? The truth is, most common cast iron steak disasters are totally preventable — but only if you spot the pitfalls before it’s too late.
- Overcrowding the Pan: When you try to cook too many steaks at once, steam builds up and sabotages the crust. Always leave space between cuts.
- Skipping Preheat Time: Cast iron needs time (at least 5 minutes) to reach searing temp. If you rush, your meat cooks before the crust forms, leaving it sad and gray.
- Moving the Steak Too Soon: Flipping before a true crust is set rips off flavor. Wait for a natural release; the steak will let go on its own.
⚠️ Important Warning: Never use wet or cold steaks straight from the fridge. According to the USDA and the National Cattlemen’s Beef Association, moisture and temperature shock prevent browning and can cause uneven cooking.
Fast Solutions Table: Mistake → Fix
| Problem | What Went Wrong | Quick Fix |
|---|---|---|
| Grey, soggy crust | Pan not hot enough | Let skillet preheat fully; dry steak thoroughly |
| Tough, chewy result | Overcooked; no resting phase | Remove steak 5°F before target; always rest 5-10 minutes |
| No flavor depth | Undersalted or generic salt | Use coarse kosher salt and season ahead |
In practice: picture this scenario — you’ve got friends over, you’re hungry, and the steak sticks to the skillet, tearing as you flip. Frustration builds. By following expert tips — letting the pan heat, using a thermometer, drying your steak — you quickly turn the mood around and serve up a steak that demands seconds.
- Expert advice: America’s Test Kitchen suggests always warming your steak to near room temp, salting it generously at least 40 minutes ahead, and patting it dry right before it hits the pan.
- And if cleanup’s a headache? Never soak your cast iron — let it cool, then wipe clean and re-oil. It’ll last decades (and give you bragging rights at the next cookout).
The right habits in place now make everything easier from here.
Your Best Steak Is Just Ahead
If you take just one thing from this how to cook steak cast iron guide, let it be: the magic is in mastering temperature, prep, and patience. A great cut, a hot skillet, and a little know-how — that’s your recipe for tender, juicy steak every time.
Before, steak night could be stressful, full of questions and second-guessing. Now? The steps are clear, the fixes are simple. You can walk into the kitchen feeling in control, confident that your skills match your taste. It’s a real upgrade.
What’s the biggest steak mistake you’ve made — and which fix are you excited to try first? Share your story in the comments. Let’s get that steak sizzling!

Blake Aaron Mercer is a cast iron cookware enthusiast and home cook dedicated to helping everyday people get the most out of their skillets, Dutch ovens, and griddles. With years of hands-on experience seasoning, restoring, and cooking with cast iron, Blake built Hnnew to be the honest, practical cast iron resource he always wished existed when he was starting out.